Fan Art

Moderators: Bookworm, starkruzr, MrFireDragon, PrettyPrincess, Wapsi

User avatar
Jabberwonky
Posts: 2963
Joined: Sun Aug 12, 2012 8:11 am
Location: Houston, Texas

Re: Fan Art

Post by Jabberwonky »

Dave wrote:
Jabberwonky wrote:davids4250 asked viewtopic.php?f=6&t=226#p2186...
I answer: Like this?
*giggle*haw*chortle*

Kinda like getting a dead horse out of the office of Dean Wormer... but no chainsaw required!
Ha-Haa! One of my all time favorite movie moments was the maintenance man in the background of that scene...
Thank you for the kind words, sir...
:lol:
"The price of perfection is prohibitive." - Anonymous
User avatar
Dave
Posts: 7586
Joined: Tue Jul 31, 2012 5:58 pm
Location: Mountain View, CA, USA

Re: Fan Art

Post by Dave »

Jabberwonky wrote:Ha-Haa! One of my all time favorite movie moments was the maintenance man in the background of that scene...
Thank you for the kind words, sir...
:lol:
Quite welcome! I could never be sure whether the guy from Facilities was getting ready to chainsaw the door, or the body of the horse. That was probably part of the point of the scene ;)
User avatar
Jabberwonky
Posts: 2963
Joined: Sun Aug 12, 2012 8:11 am
Location: Houston, Texas

Re: Fan Art

Post by Jabberwonky »

Dave wrote:
Jabberwonky wrote:Ha-Haa! One of my all time favorite movie moments was the maintenance man in the background of that scene...
Thank you for the kind words, sir...
:lol:
Quite welcome! I could never be sure whether the guy from Facilities was getting ready to chainsaw the door, or the body of the horse. That was probably part of the point of the scene ;)
The horse. It's funnier. ;)
"The price of perfection is prohibitive." - Anonymous
User avatar
shadowinthelight
Posts: 2571
Joined: Mon Jul 30, 2012 11:49 pm
Location: Somewhere, TX
Contact:

Re: Fan Art

Post by shadowinthelight »

Silly, inspired by the random thought thread.

Image
Julie, about Wapsi Square wrote:Oh goodness yes. So much paranormal!

Image My deviantART and YouTube.
I'm done thinking for today! It's caused me enough trouble!
User avatar
Julie
Posts: 1607
Joined: Tue Jul 31, 2012 3:30 pm
Location: Dallas, Texas

Re: Fan Art

Post by Julie »

shadowinthelight wrote:Silly, inspired by the random thought thread.

Image
BAHAHAHA!!
"Just open your eyes
And see that life is beautiful."
User avatar
Jabberwonky
Posts: 2963
Joined: Sun Aug 12, 2012 8:11 am
Location: Houston, Texas

Re: Fan Art

Post by Jabberwonky »

I don't have a lot to do on Friday's.....

Image
"The price of perfection is prohibitive." - Anonymous
User avatar
Jabberwonky
Posts: 2963
Joined: Sun Aug 12, 2012 8:11 am
Location: Houston, Texas

Re: Fan Art

Post by Jabberwonky »

shadowinthelight wrote:Silly, inspired by the random thought thread.
If it is chonklit chip cookies, that's exactly the response you'd get from my mother... :lol:
"The price of perfection is prohibitive." - Anonymous
User avatar
Dave
Posts: 7586
Joined: Tue Jul 31, 2012 5:58 pm
Location: Mountain View, CA, USA

Re: Fan Art

Post by Dave »

Jabberwonky wrote:I don't have a lot to do on Friday's.....
Damn, that's amazing (and fast) work. What program do you use? I've played around with GIMP quite a bit but I haven't learned the technique for coloring so subtly... I would just paint-bucket the colors in, and make a terrible mess.
User avatar
Atomic
Posts: 2948
Joined: Tue Jul 31, 2012 12:39 am
Location: Central PA
Contact:

Re: Fan Art

Post by Atomic »

Dave wrote:
Jabberwonky wrote:I don't have a lot to do on Friday's.....
Damn, that's amazing (and fast) work. What program do you use? I've played around with GIMP quite a bit but I haven't learned the technique for coloring so subtly... I would just paint-bucket the colors in, and make a terrible mess.
Time to play with the GIMP Gradient tool, and learn to do Color-to-Clear with gradients!
Don't let other peoples limitations become your constraints!

My Deviant Art scribbles
The Atomic Guide to Basic GIMP Stuff
User avatar
Jabberwonky
Posts: 2963
Joined: Sun Aug 12, 2012 8:11 am
Location: Houston, Texas

Re: Fan Art

Post by Jabberwonky »

Dave wrote:
Jabberwonky wrote:I don't have a lot to do on Friday's.....
Damn, that's amazing (and fast) work. What program do you use? I've played around with GIMP quite a bit but I haven't learned the technique for coloring so subtly... I would just paint-bucket the colors in, and make a terrible mess.
I mostly use Photoshop, but actually learned my chops on the GIMP. Mostly, very similar.

I start with adding an all white layer under the drawing, then turn the line-work layer to 'multiply' for the blend mode.
I put layers between the white layer and the line-work layer, tranparent, unless I'm looking for a background effect.
I lay the main color, like with Nudge there a mostly grey with touch of brown, in with a brush. Make sure to go 'outside the lines' a bit. I put in shading with a darker tone of the main color, using a brush again to have the control of where it goes. Same thing with hightlights. I will almost always use a Gaussian Blur to blend the edges together, rarely more than a 5 pixel blend, but play with the number to see what looks good. I'll go back over that with the smudge tool to further blend, or like with Nudge, give the more ragged furry effect. Then go back in with the eraser and clean up the edges. I use a lot of layers, but found that colors that need to blend should be on the same layer.
EDIT: Add one or two layers of highlight before blurring...

I paid out the bucks one year to become a 'Photoshop Professional', it was $79 a few years ago and it gave me great access to tutorials and other things, well worth it. But one of the things I saw from mulitple sources was it's not good enough to be good. If you want to make a living at it, you have to be fast. Clients, apparently, like to come in late because the Photoshop part is 'easy.'

:)
"The price of perfection is prohibitive." - Anonymous
User avatar
shadowinthelight
Posts: 2571
Joined: Mon Jul 30, 2012 11:49 pm
Location: Somewhere, TX
Contact:

Re: Fan Art

Post by shadowinthelight »

@Jabberwonky,
I don't always agree with your color choices but you do have good technique. Have you ever written a tutorial for people who want to learn how you color? My knowledge of the Gimp is still fairly so limited working on those pony mashups was a learning experience. I do almost everything in MS Paint and an old copy of Paint Shop Pro 7.02. I will always love PSP's controls for adding text but neither of those programs do modern things like handle PNG transparancy.
Julie, about Wapsi Square wrote:Oh goodness yes. So much paranormal!

Image My deviantART and YouTube.
I'm done thinking for today! It's caused me enough trouble!
User avatar
Atomic
Posts: 2948
Joined: Tue Jul 31, 2012 12:39 am
Location: Central PA
Contact:

Re: Fan Art

Post by Atomic »

@shadowinthelight - May I direct your attention to: The Atomic Guide to Basic Gimp Stuff

GIMP has had a few upgrades since I wrote that, but all the basics are there. The latest Windows GIMP is 2.8, and has lots of new brushes, but especially Layer Grouping (yay!), which makes life much, much easier.
Don't let other peoples limitations become your constraints!

My Deviant Art scribbles
The Atomic Guide to Basic GIMP Stuff
User avatar
Dave
Posts: 7586
Joined: Tue Jul 31, 2012 5:58 pm
Location: Mountain View, CA, USA

Re: Fan Art

Post by Dave »

Atomic wrote:@shadowinthelight - May I direct your attention to: The Atomic Guide to Basic Gimp Stuff

GIMP has had a few upgrades since I wrote that, but all the basics are there. The latest Windows GIMP is 2.8, and has lots of new brushes, but especially Layer Grouping (yay!), which makes life much, much easier.
A very nice intro, Atomic - thanks!

FYI, the link to the Wapsi image you use as a starting point, does not work... it dates back to before a reorganization of Paul's site, I guess, and the archived strip has moved.
User avatar
Jabberwonky
Posts: 2963
Joined: Sun Aug 12, 2012 8:11 am
Location: Houston, Texas

Re: Fan Art

Post by Jabberwonky »

Atomic wrote:@shadowinthelight - May I direct your attention to: The Atomic Guide to Basic Gimp Stuff

GIMP has had a few upgrades since I wrote that, but all the basics are there. The latest Windows GIMP is 2.8, and has lots of new brushes, but especially Layer Grouping (yay!), which makes life much, much easier.
That is a nice tutorial for the GIMP, great presentation, too. Thanks for putting that up.
But, the ink layer thing is soo not working for me. It keeps selecting the whole image and not the line work. I'm going to play around with it. I'm running GIMP 2.6 and that may be why it isn't acting right.
But I've always had trouble with the weird selects, maybe something in me and not the program.
I'll do like PrettyPrincess and offer my 'puter some goodies...
"The price of perfection is prohibitive." - Anonymous
User avatar
Leak
Posts: 293
Joined: Wed Aug 01, 2012 11:25 am
Location: Linz, Austria

Re: Fan Art

Post by Leak »

Jabberwonky wrote:But, the ink layer thing is soo not working for me. It keeps selecting the whole image and not the line work. I'm going to play around with it. I'm running GIMP 2.6 and that may be why it isn't acting right.
Actually, turing a grayscale image into an ink layer is even faster and easier done by simply switching it to the "Multiply" layer mode and putting an all-white layer ("New layer" even has an option for that) below it...

However, if you want to paint into that layer (which means multiply mode will look rather odd) you can also do "Add layer mask", then choose "Grayscale copy of layer" and "Inverted", then uncheck "Edit layer mask" and fill the layer with black or whatever color your want.

np: The Orb - Little Fluffy Clouds: Cumulo Nimbus Mix by Pal Joey (Adventures Beyond The Ultraworld Deluxe Edition (Disc 3))
User avatar
Atomic
Posts: 2948
Joined: Tue Jul 31, 2012 12:39 am
Location: Central PA
Contact:

Re: Fan Art

Post by Atomic »

@Dave - Thanks for pointing out my link rot. Fixed!

@Jabberwonky - The trick to making an Ink layer is the QuickMask button (see half way down). If you don't get the red/black image when you paste, either you didn't make a black fill ink layer, or you missed clicking the button first before pasting.

@Leak - Yes, Multiply and the other layer functions are tons of fun! I use them for making shades that directly affect the color but not changing the base color. I tend to use Multiply for darkening areas (sometimes Burn depending on the color), and Screen for lightening them, using 50% gray (808080) with airbrush. For example:
Image
Each item was a base color fill extended under the ink layer to avoid holes (edited for eye edges), then manipulating the layers above them to add texture, shading, and highlights. Enjoy!
Don't let other peoples limitations become your constraints!

My Deviant Art scribbles
The Atomic Guide to Basic GIMP Stuff
User avatar
Jabberwonky
Posts: 2963
Joined: Sun Aug 12, 2012 8:11 am
Location: Houston, Texas

Re: Fan Art

Post by Jabberwonky »

Leak wrote:
Jabberwonky wrote:But, the ink layer thing is soo not working for me. It keeps selecting the whole image and not the line work. I'm going to play around with it. I'm running GIMP 2.6 and that may be why it isn't acting right.
Actually, turing a grayscale image into an ink layer is even faster and easier done by simply switching it to the "Multiply" layer mode and putting an all-white layer ("New layer" even has an option for that) below it...

However, if you want to paint into that layer (which means multiply mode will look rather odd) you can also do "Add layer mask", then choose "Grayscale copy of layer" and "Inverted", then uncheck "Edit layer mask" and fill the layer with black or whatever color your want.

np: The Orb - Little Fluffy Clouds: Cumulo Nimbus Mix by Pal Joey (Adventures Beyond The Ultraworld Deluxe Edition (Disc 3))
I normally work with the muliply mode, but I'm printing this to take over to my compter and give it a try.
Thanks for the advice.
Atomic wrote:@Jabberwonky - The trick to making an Ink layer is the QuickMask button (see half way down). If you don't get the red/black image when you paste, either you didn't make a black fill ink layer, or you missed clicking the button first before pasting.
I'm sure it's my spastic nature making me skip a step, It's harder to follow instructions while I'm at work. (ask my supervisor) But I'm going to put a little time in on figuring this out. (I'm more of an intuitive leap than a logical step kind of thinker)

Atomic wrote:@Leak - Yes, Multiply and the other layer functions are tons of fun! I use them for making shades that directly affect the color but not changing the base color. I tend to use Multiply for darkening areas (sometimes Burn depending on the color), and Screen for lightening them, using 50% gray (808080) with airbrush. For example:
(img edit)
Each item was a base color fill extended under the ink layer to avoid holes (edited for eye edges), then manipulating the layers above them to add texture, shading, and highlights. Enjoy!
Okay, that is a technique I've been looking for, a way of shading the base color instead of picking darker, or lighter, colors. I"m going to play with that!

And, a beautiful Brandi, maybe my favorite piece I've seen on this thread.
Wonderful!
"The price of perfection is prohibitive." - Anonymous
User avatar
Jabberwonky
Posts: 2963
Joined: Sun Aug 12, 2012 8:11 am
Location: Houston, Texas

Techniques

Post by Jabberwonky »

Okay, I got the Ink Fill problem worked out. I was using images I'd already flipped to RGB. Using Greyscale makes the whole process work. I don't see much of a difference yet, but I've only played with it for a few moments.

I used Atomics suggestion of different layers to burn and lighten for tone. Again, only messed with it for a few minutes, I need to tweak around and see how to work it better.

The results are here -

Image

@Atomic - Are you cutting the tones with the pen tool? That's another technique I'm going to have to work on...
"The price of perfection is prohibitive." - Anonymous
User avatar
Atomic
Posts: 2948
Joined: Tue Jul 31, 2012 12:39 am
Location: Central PA
Contact:

Re: Techniques

Post by Atomic »

Jabberwonky wrote:Okay, I got the Ink Fill problem worked out. I was using images I'd already flipped to RGB. Using Greyscale makes the whole process work. I don't see much of a difference yet, but I've only played with it for a few moments.
@Atomic - Are you cutting the tones with the pen tool? That's another technique I'm going to have to work on...
I work entirely RGB. You can use the Threshold tool to snip off the lighter grays, but though PW works in ink, there's lots of edge shading as well, no doubt from the scanning and resizing processes to create the strip. I keep these details.

When using the Ink layer to select an area, I always expand it by 2-3 pixels to underlap the ink above it. It helps to enlarge the base image to 200% first. This lets me get the details better, then I shrink the final JPG back to normal size. This also softens any boo-boos, and if it looks bad, you still have the intact 2x XCF file to adjust.

As for getting edges on the tones, I have separate Lighten and Darken layers. This lets me 10-20% airbrush gently my way to the change desired, then soft or hard erase the edge as needed to sharpen. Some times I'll use full black instead of 50% gray to further darken an area, then smudge as needed to feather the edge. If I overdo it, I Burn/Dodge the Lighten/Darken layer to adjust rather than erase and rework.

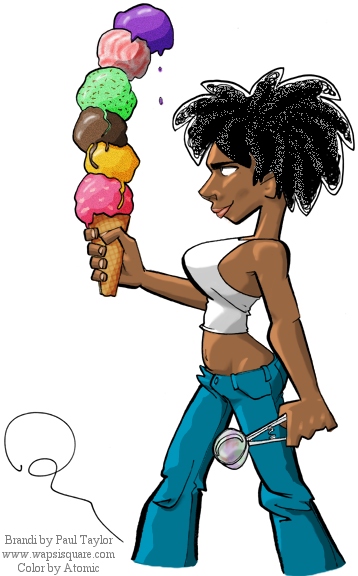
For the Brandi image above, I used the paintbrush to specifically get good edges on my light/dark areas, then adjusted layer opacity to get the tones where I wanted them. This gave me a 3 tone palette. Compare the pants and arms to the ice cream colors. The two red scoops were airbrushed on their own layer, then shadowed the same way as the body.

Haven't used the Ink tool much to get nice sharp points, but that works too -- just remember to complete the polygon so you don't overflow. I simplify this by having another layer (I call Stencil) for "Create Path", close the shape, Stroke Path (or Paint Along Path, depending on your menu), then Select Area and fill on my Lighten/Darken layer instead of that path layer. Layer grouping helps tons with this by keeping the setup layers apart from the color and accent layers.

Happy scribbling!
Don't let other peoples limitations become your constraints!

My Deviant Art scribbles
The Atomic Guide to Basic GIMP Stuff
User avatar
shadowinthelight
Posts: 2571
Joined: Mon Jul 30, 2012 11:49 pm
Location: Somewhere, TX
Contact:

Re: Fan Art

Post by shadowinthelight »

Here is a WIP of what I'm working on. I'll make the SVG available when finished (which I probably already would be if Inkscape wasn't so slow with spastic controls on my computer Image).

Image

@Jabberwonky,
I just noticed you seem to have accidentally colored in the spike on Nudge's right shoulder as part of the background. Image
Julie, about Wapsi Square wrote:Oh goodness yes. So much paranormal!

Image My deviantART and YouTube.
I'm done thinking for today! It's caused me enough trouble!
Post Reply